

Hello everyone,
It is now two weeks I use Lightroom 5 and I can now share with you my first impressions on this new upgrade.
The point of this review is not to make a complete class about Lightroom 5, there are many new features and tools, some that you can see immediately and some that you will never see (but they are still there :-)). So if you want to have the full list of what is new you can simply click here.
So I will basically talk about the main new features, only the ones that I am using in my every day work and I assume that they are the ones that will make you decide whether it is worth upgrading from Lightroom 4 or not.
First tool is the advanced healing brush. You remember before when there was some electric wire going through the picture, how many circular clicks did you have to make to get rid of it ? With LR 5….just one : now comes a really much more powerful and allowing the spot removal tool for non-circular click-and-drag healing and cloning, coming with a quick identification of spots with Visualize Spots :
A first quick example with the reflection of my flash on top of this lady’s cheek 
One second to spot it and as always Lightroom proposes you the replacement zone :

and here’s what we get

Another very interesting example with something a bit more serious like these red feathers in the upper right corner : a bit of advanced healing brush

and here’s what we get :

Pretty good right ?
I was talking about electric wires a bit earlier so here’s one last example of what can be done with the advanced healing brush in that kind of situation. Here are some very annoying metallic wires in front and behind the elephant 
Magic tool….. (I already erased the back one) and here’s what comes next
Sincerely, it took me less than 3 seconds to make it. This tool is actually so good that it is easier and faster than the tools on Photoshop. And so far it’s been fully reliable on 100 % of the times I had to use it.
Still talking about the spot removal tool, I also noticed a real difference in the spots that Lightroom is proposing us to replace the “bad ones”. Lightroom is now much more accurate and can propose replacement spots which can really be far from the initial spot. Here’s a couple of examples :

So we really get better results and to make it simple the improvements made for the spot removal tool are just GREAT !!
Second new feature proposed on LR5 is the radial filter tool. Unlike the advanced healing brush which is an upgrade of the spot removal tool, the radial filter is a brand new tool
The radial filter tool enables you to easily apply Lightroom’s selective adjustments including color and tonal corrections (same as the brush tool) inside or outside the selected areas of your picture.
Here is a first example :
I do like the light on this man on stage but I thought it would be better to have a darker background
very simple in fact, jsut as the brush tool, I decrease the exposure until I get what I want (on the right panel)
and here’s what I get
Some will say that it is just an improved vignetting tool but it’s not as you can hit all of LR selective adjustments. I personally mostly used the exposure adjustment so far such as here (another picture on a stage)
where I wanted to get rid of the photographer in the low center part of the picture and emphase the light on what is happening on stage
And there’s no way you can get such a good result with the vignetting tool. Honestly, if you don’t know that there is a photographer in the foreground, chances are that you will look at the pictures without even noticing him. So once again I would say that this tool is just GREAT again 🙂

The third new feature that I want to talk about now is the Upright perspective corrections. LR5 has improved this part and proposes now to automatically correct problems such as tilted horizons or converging verticals in buildings for example.
Even if most of us are not architecture photographers, many landscape pictures need to be arranged in terms of distortion and perspective, so I must admit that I was quit eager to see how this new feature would work. It appears in this new “Basic” tab.
So here is a first example. As a corporate photographer, I often shoot for companies and follow their events. That often takes me to set up photo booths and shoot people in front of backdrops. And as always I have the same distortion problem, very visible on the upper edge of the backdrop.
Until now I always corrected the distortion manually as I never was satisfied with the automatic feature that LR was proposing. So I clicked on “enable profile corrections” and here’s what came next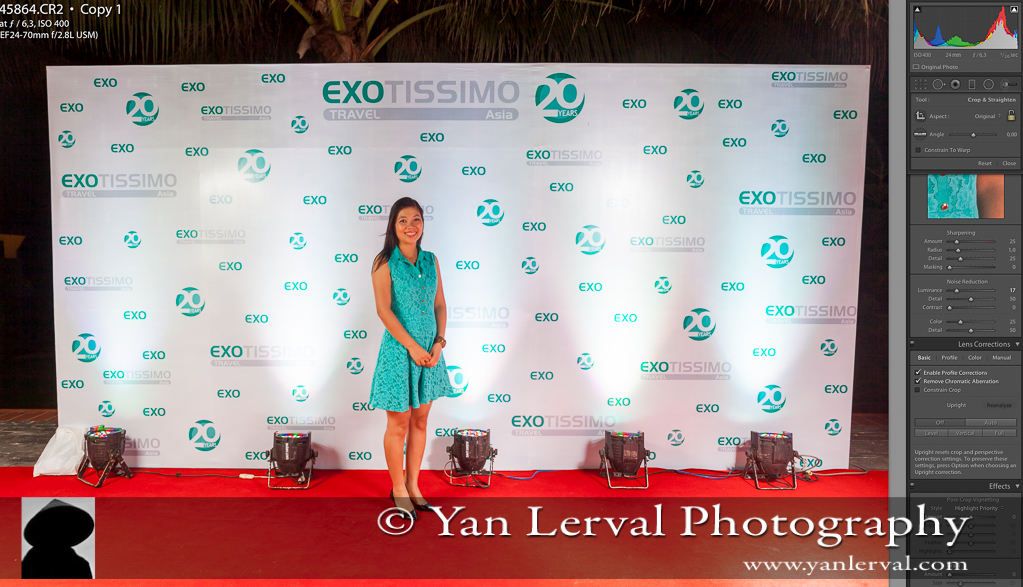
I must say that I was very surprised by that result, my panel is straight and the distortion has disappeared. Then I tried on the following ones (more than 200 pictures in front of that backdrop) and the result was always the same : good
Then of course I was really hoping to get good result on the horizontal and vertical distortion. I tried “Auto” first :

Then I tried “Full” :
to finally end up as always on the manual panel to fix everything by myself :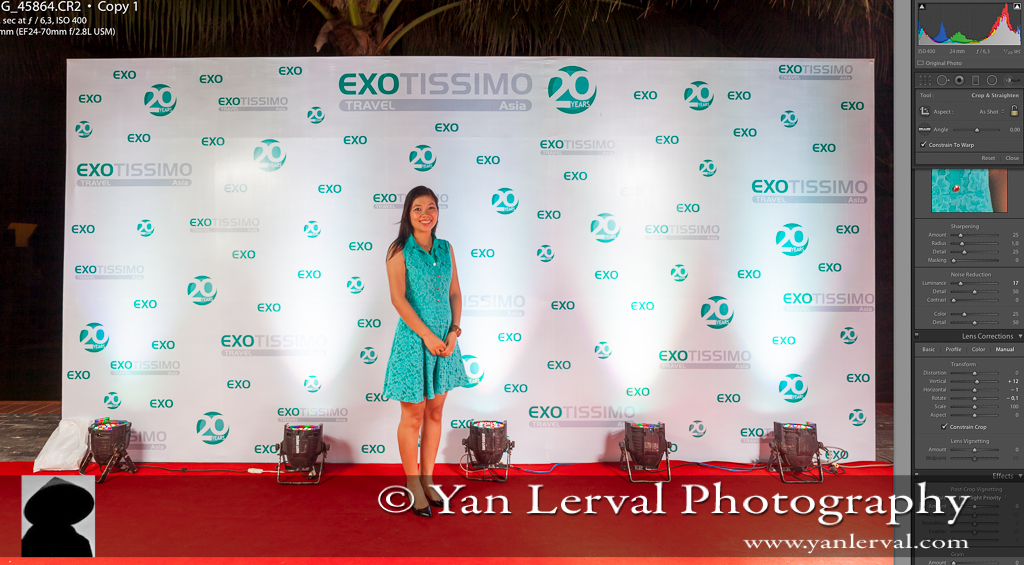
and finally proposed that one as a final result to my customer after a last crop :
I must say that I was expecting a lot from that tool knowing that I use it on hundreds of pictures and hoping that it would make me gain a lot of time. Well maybe LR6 will ???
But since I read lots of articles and reviews that were all saying that this tool was a huge improvement for LR, I really wanted to understand why I did not get any good result. So I picked a picture in my library, the kind of picture very close to the ones Adobe are using to demonstrate their new tools, one with very clear buildings in front of a very clear background and with a lot of very obvious and common vertical distortion, a picture like that one :
You see what I mean ? Can’t get a better example ! So I just clicked on “Auto” again and here’s what came out :
Just perfecT !!!
Ok so what my point is, don’t expect too much from LR5 about these automatic corrections. That kind of tool works really well on “simple” pictures, pictures that are made for that tool should I say, which probably are 90% of the pictures we all will get when we shoot landscapes or architecture. But it won’t work if it becomes a bit too complex and tricky such as my “backdrop ones”. And this is the same for the automatic horizon line correction, also one of the new tools included in that “Basic” panel. It works really well when horizontal or vertical lines are really obvious, otherwise you can get some weird results.
Once you know that and you don’t expect miracles on every single of your pictures, you will use that tool accordingly and will definitely gain a lot of time (I think about all my students who never shoot straight for example ;-))
Next very new feature is The smart previews
When I first heard about that I really thought that it was one more GREAT idea :-). Just imagine, no need to bring your heavy raw files with you whenever you’re going somewhere and need to work on your pictures. No need to carry on your external hard drives with you. And for those who are using computers with small hard drive capacity, it’s just great !!! Very simply, the smart previews allow you to develop your photos, even when the masters are offline. So you can just work on your photos on the road, and when you get home and reconnect your hard drive, your work is seamlessly applied to your masters. All you need on the road are your laptop your catalog, and smart previews of your photos. Not interested in traveling with your photos? Smart previews may still give you a performance benefit in the Develop module. Finally, Adobe has hinted that at some point in the future, smart previews will enable us to work with our photos in a Lightroom app on our mobile devices and takes us to this post : Lightroom app soon to be on your iPad
Well of course if you only work at home on your desktop this new feature has no real meaning for you but if you travel often it really can change a lot the way you will organize yourself. I personally do like it a lot and just thought : “Why did they wait for the 5th version to propose that ?”
So here are for me the most important new features of this 5th version of Lightroom. This is very personal of course as they are the ones I use the most in my everyday work so I believe they are the ones I must spend time with.
Two or three additional things though are :
- Grid and guide overlays for Library, Develop and tethered capture:


- True fullscreen mode (F) (old behavior: shift-F)
- Slideshow: videos can be included in slideshows; improved synchronization of slides with soundtrack duration
Once again there are many new things coming with LR5 and most of them are behind the curtain, we don’t see them, we don’t even know they’re there but they make everything work smoother. The link to check this full list is on top of this post.
So to complete this post and to answer the only question : Lightroom 5 or not Lightroom 5 ?
When I read posts and reviews a bit everywhere on the web, I can see very different opinions and advices. I would say that Adobe gave us a bad habit with many visible new features when they proposed LR4, much more than LR5. But as I just said there is a lot of work behind the curtain and Lightroom 5 works perfectly. It is as fast as LR4 when LR4 was much heavier than LR3 and the difference was really obvious.
I read that LR5 should have been an upgraded version of LR4 and become a LR4.5. This is logical if we just talk about the visible part of the iceberg. But LR5 definitely is a whole new version when we see the whole piece.
To upgrade to LR5 will cost you US$79 (I will not talk about the price of the full version as I assume you already have at least LR4 on your laptop), it’s not so much money but it becomes important when Adobe proposes a new version every year.
Once again I will make it very simple
- You’re a pro? you upgrade ! these new features such as the advanced healing brush or the radial filter are definitely worth it. And I’m not even talking about the new searching and organizing tools in the library module to help us find the pictures we need even more easily.
- You’re not a pro but LR is your “everyday best friend”? you upgrade ! For the same reasons just above
- You use LR from time to time, you mostly appreciate the library module to easily organize the pictures and you don’t really master the develop module, then I would say that it is not worth it and I would advise you to wait for LR6.
The very good thing is that you can make up your own mind for free and download the trial version directly here. You will have 30 days to make up your mind which I believe it to be way enough. To help you on that just get there and there
I surely would not advise you to spend too much time on forums where you will get tons of informations in all directions which will definitely not help you.
Well I hope that this review based on my very personal experience will help you, I will be happy to get your opinions and answer your comments.
Bye for now


Thanks, great review Yan – really helpful! I just downloaded the trial version 🙂
Great Sue, let me know what you think about it 🙂
Thanks Yan, many good examples- I just bought the upgrade and I am ready to dive in. Looks like the only reason I’ll be using Photoshop is for some pretty sophisticated skin retouching actions I use in it, and some actions from Paint the Moon which I love. From what you have said- wondering if there are any improvements to the Split tone functions or for BW conversions…?
Hi Richard,
Glad you liked that review. I have seen absolutely no difference for the split tone functions but I must admit that I barely use that tool. About the B&W conversion, Adobe says that they improved their treatment but there again I do not really notice anything new, not to say better.